
TinyTask Auto Clicker: Record and Playback Automated Clicks
TinyTask doubles as a powerful auto clicker for Windows. While it is technically a macro recorder, its record-and-playback system makes it one of the easiest ways to automate repetitive mouse clicks without installing bloated software or writing scripts. At just 36 KB, TinyTask can handle everything from rapid clicking in idle games to automating data entry clicks in spreadsheets.
This guide shows you exactly how to set up TinyTask as an auto clicker – from basic rapid-click recordings to advanced multi-point sequences for gaming, productivity, and software testing. You will also find a head-to-head comparison with dedicated auto clicker tools so you can pick the right one for your task.
How TinyTask Works as an Auto Clicker
A dedicated auto clicker repeats a single mouse click at a fixed interval – click this spot every 100 milliseconds, for example. TinyTask takes a fundamentally different approach. It records everything you do (mouse movements, clicks, keyboard presses, timing between actions) and plays it all back exactly as you performed it. This means your auto-click macros can be far more flexible than what a standard single-point auto clicker offers.
With TinyTask as your auto clicker, you can:
- Click a single point repeatedly at whatever speed you clicked during recording
- Click multiple different points in sequence – click button A, wait, click button B, wait, click button C
- Mix clicks with keyboard presses – click a field, type text, press Tab, click another field
- Include mouse movement between clicks – walk to a spot in a game, click, walk to the next spot
- Loop the entire sequence indefinitely using Continuous Playback mode
- Save macros as standalone .exe files that run on any Windows PC without TinyTask installed
Key difference: A standard auto clicker gives you precise interval control (exact milliseconds between clicks) but only clicks one spot. TinyTask gives you sequence recording (multi-step automations) but click speed is determined by how fast you click during recording. Choose based on whether you need precision or flexibility.

The TinyTask toolbar – Open, Save, Rec, Play, .exe, and Prefs buttons are all you need for auto clicking
Setting Up TinyTask as an Auto Clicker (Step by Step)
1 Download TinyTask
Download TinyTask from our website. The file is 36 KB, portable (no installation needed), and runs on Windows XP through Windows 11. Save the .exe file anywhere on your computer – your desktop, a USB drive, or any folder. Double-click to launch it. A small toolbar appears at the top of your screen with Record, Play, Save, and Open buttons.
Since TinyTask is portable, it leaves no registry entries and requires no admin privileges. You can run it from a USB drive on any Windows machine.
2 Record Your Click Pattern
Press Ctrl + Alt + Shift + R to start recording. Now click wherever you want the auto clicker to click. TinyTask captures every mouse movement, click, and the exact timing between actions.
For fast auto-clicking (gaming, idle clickers): Click as rapidly as you can on the target spot. If you click 10 times in 2 seconds during recording, TinyTask will replay those 10 clicks in 2 seconds every loop. Keep the recording short – 2-5 seconds of rapid clicks is ideal.
For timed clicking (forms, workflows): Click once, wait the desired interval, click again. TinyTask captures the exact pause between clicks. If you click once per second during recording, playback will click once per second.
For multi-point sequences: Click on the first target, move to the second target, click there, move to the third, and so on. TinyTask records the full path and timing. This is where TinyTask outperforms every single-point auto clicker.
Press Ctrl + Alt + Shift + R again to stop recording.
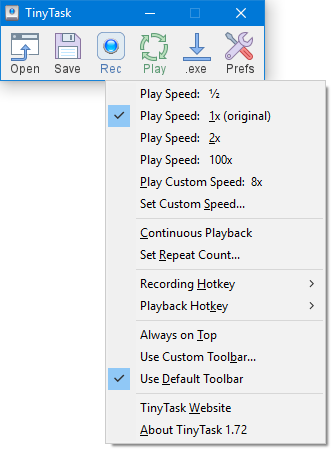
TinyTask context menu – configure play speed, continuous playback, and custom hotkeys
3 Play Back on Loop
Press Ctrl + Alt + Shift + P to start playback. TinyTask replays your exact click pattern – same coordinates, same timing, same sequence.
To make it loop continuously, click the small dropdown arrow on the TinyTask toolbar and enable “Continuous Playback”. The macro will repeat until you press the stop hotkey (Ctrl + Alt + Shift + P again) or close TinyTask.
Pro tip: You can also set a specific number of loop iterations instead of infinite. Right-click the TinyTask toolbar, check “Continuous Playback” and set the repeat count to your desired number of loops.
4 Save Your Auto-Click Macro
Click the Save button on the toolbar to save your auto-click macro as a .rec file. You can reload it anytime with the Open button – no need to re-record the same click pattern.
For maximum convenience, use the Compile feature (File > Compile) to convert your macro into a standalone .exe file. Double-click the compiled .exe and it starts clicking immediately – you do not even need TinyTask open. This is particularly useful for auto-click macros you run daily.
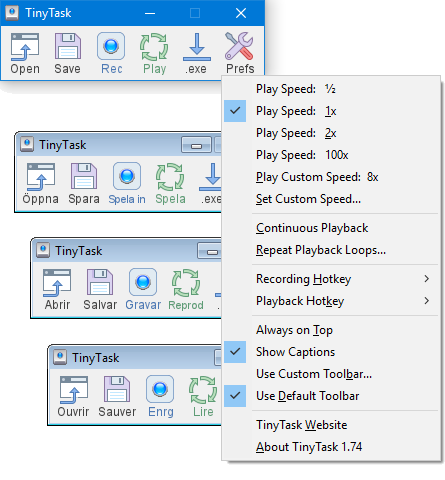
TinyTask full interface – toolbar, context menu with speed/loop settings, and multilingual support
Auto Clicker Use Cases
Gaming
Idle clickers, Cookie Clicker, Roblox simulators, Minecraft auto-farming. Record rapid clicks on the game’s target, enable continuous playback, and let it run. TinyTask captures full farming routes with movement between click points. See our TinyTask for Roblox guide for game-specific tips.
Data Entry
Click “Next” through 500 pages, check the same checkbox in long forms, or click through repetitive approval workflows. Record the sequence once and let TinyTask handle the rest. Particularly useful for bulk email processing, CRM updates, and invoice approvals.
Software Testing
QA testers use TinyTask to simulate repetitive user interactions – clicking buttons, navigating menus, submitting forms. Not a replacement for Selenium or Cypress, but fast to set up for quick smoke tests and regression checks on desktop applications.
Accessibility
Users with repetitive strain injuries or limited mobility use TinyTask to reduce the number of physical clicks needed for daily tasks. Record a common workflow once, replay it with a single hotkey instead of dozens of individual clicks.
Online Shopping
Refresh a product page and click “Add to Cart” the instant a limited-stock item goes live. Record the click sequence during a practice run, then replay it when the drop happens. Timing matters – TinyTask’s playback is nearly instant from the hotkey press.
Batch Processing
Photo editing, file renaming, batch exports – any desktop software where you repeat the same 3-5 clicks for each file. Record the click sequence on one file, then loop it across your entire batch. Works well with apps like Photoshop, GIMP, or file managers.
TinyTask vs Dedicated Auto Clickers
Should you use TinyTask or a dedicated auto clicker? Here is how they compare on the features that actually matter.
| Feature | TinyTask | OP Auto Clicker | GS Auto Clicker | AutoHotkey |
|---|---|---|---|---|
| Click speed control | Recording speed | Custom ms interval | Custom ms interval | Custom (scripted) |
| Multi-point clicking | Yes (recorded seq.) | No (single point) | No (single point) | Yes (scripted) |
| Keyboard input | Yes | No | No | Yes |
| Mouse movement | Yes | No | No | Yes (scripted) |
| Precise ms interval | No | Yes | Yes | Yes |
| Click type (L/R/Mid) | As recorded | L / R / Middle | L / R | Any |
| Looping | Yes | Yes | Yes | Yes |
| Save as .exe | Yes | No | No | Yes |
| Learning curve | None | None | None | Moderate |
| File size | 36 KB | ~1 MB | ~500 KB | ~4 MB |
| Price | Free | Free | Free | Free (open source) |
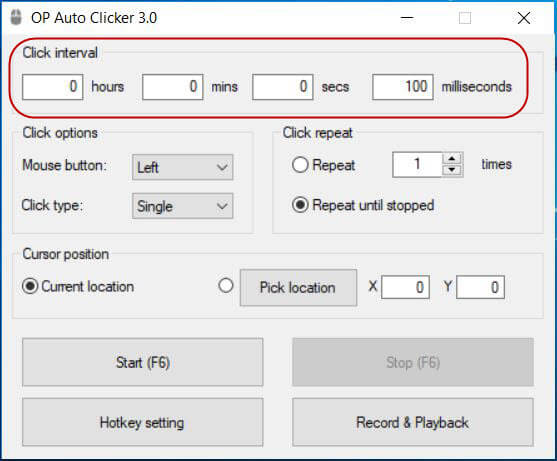
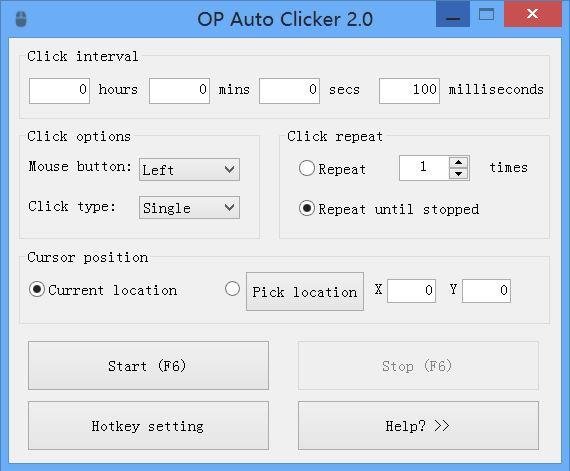
OP Auto Clicker interface – precise interval control for single-point clicking, compared to TinyTask’s sequence-based approach
Use TinyTask when: you need multi-step click sequences, keyboard input mixed with clicks, mouse movement between click points, or the lightest possible tool. TinyTask is also the only one that compiles macros into standalone .exe files.
Use a dedicated auto clicker when: you need precise control over click intervals (like exactly 50ms between clicks), or you only need to click a single fixed point rapidly. OP Auto Clicker and GS Auto Clicker are better for single-point rapid clicking with exact timing.
Use AutoHotkey when: you need both precise timing AND complex multi-step sequences, and you are comfortable writing simple scripts. AutoHotkey is the most powerful option but requires learning its scripting language.
Tips for Better Auto-Click Macros
- Keep recordings short and loop them. A 3-5 second recording looped 10,000 times is more reliable than a 10-minute recording played once. Short recordings reduce timing drift and are easier to debug when clicks miss their targets.
- Lock your screen layout before recording. TinyTask records absolute pixel coordinates. If any window moves, resizes, or scrolls between recording and playback, clicks will land in the wrong spot. Position your target window, then maximize it or snap it to a fixed position before you hit Record.
- Enable Do Not Disturb on Windows. A popup notification during playback steals focus and sends clicks to the wrong window. On Windows 10/11, press Win + A and toggle Focus Assist / Do Not Disturb before running your macro.
- Add slight timing variation for games. Some anti-cheat systems detect perfectly uniform click intervals. During recording, vary your click timing slightly – click fast but not perfectly rhythmic. This mimics natural human clicking patterns and reduces ban risk.
- Always test the first loop. Watch the first complete playback cycle to verify all clicks hit their targets before leaving the macro unattended. A single misaligned click can cascade into a chain of wrong actions.
- Use lower screen resolutions for bigger targets. If your clicks keep missing small buttons, lower your display resolution temporarily. The buttons become larger targets, and TinyTask’s coordinate-based clicking becomes more forgiving. Switch back to native resolution after recording.
- Compile frequently-used macros to .exe. If you run the same auto-click sequence daily, compile it into a standalone .exe (File > Compile). Pin the .exe to your taskbar or add it to startup. Double-click to run – no need to open TinyTask and load the .rec file every time.
TinyTask Auto Clicker Hotkeys
| Action | Hotkey | Description |
|---|---|---|
| Start/Stop Recording | Ctrl + Alt + Shift + R | Begins capturing mouse and keyboard input. Press again to stop. |
| Start/Stop Playback | Ctrl + Alt + Shift + P | Replays the recorded macro. Press again to stop mid-playback. |
| Open Macro File | Ctrl + O | Load a previously saved .rec file. |
| Save Macro File | Ctrl + S | Save current recording as a .rec file. |
Pro tip: The 4-key hotkey combo (Ctrl + Alt + Shift + R/P) is intentionally complex so you do not accidentally trigger recording or playback during normal computer use. If you find it awkward, you can use the toolbar buttons instead.
Common Auto Clicker Problems and Fixes
Clicks landing in the wrong spot
This is almost always a window position issue. TinyTask records clicks at absolute screen coordinates (like pixel 450, 320). If your target window moved even slightly between recording and playback, every click will be offset. The fix: always position your target window in the exact same spot before replaying. Maximize the window for the most consistent results, since maximized windows always fill the same area.
Macro runs too slow or too fast
TinyTask replays at exactly the speed you recorded. There is no speed multiplier built in. If you need faster clicks, record a new macro where you click faster. If you need slower clicks, record with longer pauses. For precise millisecond timing that TinyTask cannot provide, switch to OP Auto Clicker or write a short AutoHotkey script.
Playback stops unexpectedly
Check three things: (1) Did you accidentally press the stop hotkey? (2) Did Continuous Playback get toggled off? Right-click the toolbar to verify. (3) Is another program stealing keyboard focus? Some games grab exclusive input, which can interfere with TinyTask’s hotkeys. Try running TinyTask as administrator (right-click > Run as administrator) to give it higher input priority.
TinyTask does not record right-clicks
TinyTask records both left and right mouse clicks. If right-clicks are not replaying, make sure you are not clicking on TinyTask’s own toolbar during recording (which would open its context menu instead of recording the click). Record right-clicks only inside your target application window.
Frequently Asked Questions
Is TinyTask the same as an auto clicker?
Not exactly. An auto clicker is a specialized tool that clicks a single screen position at a fixed interval – you set the coordinates, set the milliseconds between clicks, and it repeats. TinyTask is a full macro recorder that captures mouse movements, clicks, keyboard presses, and all timing between actions.
However, TinyTask can absolutely be used as an auto clicker by recording a series of rapid clicks and playing them back on loop. The practical difference: TinyTask gives you sequence recording (multi-step automations with movement between clicks), while a dedicated auto clicker gives you precise interval control (exact milliseconds between clicks at one fixed point).
For most auto-clicking tasks – gaming, form filling, batch processing – TinyTask is actually more versatile because it handles multi-point sequences that single-point auto clickers cannot.
Can TinyTask click faster than I can?
No. TinyTask plays back clicks at the exact speed you recorded them. If you click 5 times per second during recording, playback runs at 5 clicks per second. If you click 20 times per second (about the limit for most people), playback runs at 20 clicks per second. TinyTask has no speed multiplier or interval override.
If you need extremely fast clicking – 100+ clicks per second or exact millisecond intervals – use a dedicated auto clicker. OP Auto Clicker supports intervals as low as 1 millisecond (1,000 clicks per second). AutoHotkey scripts can also achieve very high click rates with precise timing control.
Is using TinyTask as an auto clicker safe?
TinyTask itself is completely safe. It is a 36 KB portable executable that does not access the internet, does not collect data, does not modify system files, and does not require installation. It has been around since the early 2000s and is one of the most widely used macro tools on Windows.
Whether using it as an auto clicker is “safe” depends on where you use it. For personal productivity – data entry, form filling, batch processing, software testing – there is zero risk. For online games, you need to check the game’s terms of service. Many online games (Roblox, Fortnite, Valorant, World of Warcraft) explicitly prohibit automated input tools and will ban accounts that use them.
For single-player or offline games, auto-clicking carries no risk at all. You are only automating your own inputs on your own machine. Download TinyTask from our official download section to make sure you get the legitimate 36 KB file.
Does TinyTask auto clicker work in the background?
No. TinyTask sends mouse clicks and keyboard inputs to whatever window is currently in the foreground. If you switch to a different window during playback, the clicks go to that new window instead of your target application. You need to keep the target window in focus for the entire duration of the macro playback.
This means you cannot use your computer for other tasks while a TinyTask macro is running. If you need background clicking (automating one app while using another), you need a different tool. AutoHotkey’s ControlClick command can send clicks to specific windows regardless of focus. Some dedicated auto clickers also support background mode.
How do I record an auto clicker with TinyTask?
Open TinyTask (double-click the .exe file), press Ctrl + Alt + Shift + R to start recording, then click wherever you want the auto clicker to click. Click as fast or slow as you want – TinyTask captures the exact timing. Press Ctrl + Alt + Shift + R again to stop recording.
To play it back: press Ctrl + Alt + Shift + P. For continuous looping, click the dropdown arrow on the TinyTask toolbar and enable “Continuous Playback” before pressing play. The macro repeats until you press the playback hotkey again to stop it.
Save your recording (Ctrl+S) as a .rec file so you can reload it later without re-recording. For daily auto-click tasks, compile the macro to a standalone .exe (File > Compile) so you can run it directly without opening TinyTask.
Can TinyTask auto click on multiple points?
Yes, and this is TinyTask’s biggest advantage over dedicated auto clickers. During recording, move your mouse to the first click target, click, move to the second target, click, move to the third, and so on. TinyTask captures the full sequence – all mouse movements, all click coordinates, and all timing between actions.
When you play it back on loop, TinyTask repeats the entire multi-point sequence. This is something that OP Auto Clicker and GS Auto Clicker cannot do – they only support clicking a single fixed point. For workflows that involve clicking through multiple buttons, tabs, or form fields in order, TinyTask is the better tool.
TinyTask auto clicker vs OP Auto Clicker – which is better?
It depends on your task. OP Auto Clicker is better for single-point rapid clicking with precise interval control. You set a target, choose the click interval in milliseconds, pick left/right/middle button, and start. It gives you exact timing control that TinyTask does not offer.
TinyTask is better for everything else: multi-point sequences, click patterns that include mouse movement, macros that mix clicks with keyboard input, and compiled .exe auto-click scripts. If your auto-clicking involves more than tapping one spot, TinyTask is more capable.
For gaming: OP Auto Clicker if you need to click one button extremely fast (cookie clicker, idle games with a single click target). TinyTask if you need farming routes, multi-button sequences, or click+keyboard combos. Both are free and lightweight – you can keep both installed and use whichever fits the task.
Will I get banned for using TinyTask as an auto clicker in games?
It depends on the game. Single-player and offline games have no anti-cheat, so auto-clicking carries zero risk. Online multiplayer games are a different story – most prohibit automated input in their terms of service, and many have active anti-cheat systems that detect auto-clicking patterns.
Games with aggressive anti-cheat (Valorant/Vanguard, Fortnite EAC, Roblox) can detect perfectly timed clicks, inhuman click speeds, and input patterns that run for hours without variation. If you use TinyTask in these games, you risk account bans. Some tips to reduce detection: add slight timing variations during recording, take breaks between sessions, and never run macros at maximum click speed for extended periods.
Games without server-side anti-cheat (most single-player games, some older MMOs, sandbox games) are generally safe for auto-clicking. Use your judgment and check the game’s specific policies before automating.
How do I make TinyTask click at exact millisecond intervals?
You cannot set exact millisecond intervals in TinyTask. TinyTask’s click timing is determined entirely by how fast you click during recording. If you need precise intervals (like exactly 100ms between clicks), use a dedicated auto clicker instead:
- OP Auto Clicker: Set any interval from 1ms to hours. Free, lightweight, and the most popular choice for precise single-point clicking.
- AutoHotkey: Write a short script with exact Sleep values between clicks. More setup, but full control over everything.
- GS Auto Clicker: Similar to OP Auto Clicker with customizable intervals and click type selection.
If you still want to use TinyTask, you can approximate intervals by practicing your click timing during recording. Use a metronome app set to your desired clicks-per-second to keep rhythm while recording.
Can I use TinyTask auto clicker on Mac or Linux?
No. TinyTask is a Windows-only application. It uses the Windows API to capture and replay mouse/keyboard input, and there is no macOS or Linux version. On Mac, the closest equivalent is Automator (built-in) or Keyboard Maestro ($36). On Linux, xdotool or AutoKey can automate clicks and keystrokes.
You could technically run TinyTask on Mac or Linux through Wine (a Windows compatibility layer), but the mouse coordinate mapping between the host OS and Wine is unreliable. Native automation tools for each OS are a much better choice. Check our TinyTask for Mac guide for Mac-specific alternatives.